Kubernetes: Beyond Docker Compose
Explore how Kubernetes extends the capabilities of Docker Compose for managing containerized applications at scale

Published
- 6 min read
Beyond Docker Compose
When I first started using Docker to containerize my applications, I often included a docker-compose.yml file alongside them (sometimes in a separate repository) to illustrate how local deployment could work. With docker-compose, you can:
- Define the services and applications required to run a specific solution.
- Detail how these services interact with one another.
- Specify the order in which they should start.
- Describe the network where the containers will be deployed.
- Set up the environment to ensure everything works seamlessly.
I quickly grew accustomed to the simplicity and utility of Docker Compose. However, deploying services with Docker Compose in this way (without Swarm mode) has a significant limitation: it only supports deployment to a single machine.
For more advanced deployment scenarios, such as:
- Deploying services on a cluster with multiple nodes.
- Implementing a scaling strategy.
- Coordinating updates with zero-downtime deployment.
…you need a container orchestrator. Several options exist for container orchestration in the cloud, including Docker Swarm, Kubernetes, Apache Mesos, and Cloud Foundry’s Diego.
The right tool depends on your specific needs. For me, Kubernetes struck an excellent balance between features and ease of use. Here’s why I believe Kubernetes is a great choice:
- Seamless integration with Docker: If you’re already using Docker containers, you’re halfway there.
- Open-source flexibility: You’re not locked into a single provider. Kubernetes is supported by multiple cloud providers, and you can deploy clusters on virtually any infrastructure.
- Comprehensive documentation: The official documentation is excellent.
- Popularity and community support: Kubernetes is currently the most widely used container orchestration technology. If you encounter a problem, there’s a high likelihood of finding help on Stack Overflow.
- Local testing with Minikube: You can install Minikube on your machine to test your solution end-to-end before deploying it to the cloud. If something goes wrong, debugging locally is far quicker than dealing with cloud deployments.
This last point is a game-changer compared to other cloud technologies. The ability to run everything locally simplifies the development process significantly. Instead of making small changes to a .yml file, triggering CI pipelines, and hoping for the best during deployment, you can ensure everything works locally with Minikube—greatly improving the odds of a smooth deployment in the cloud.
Learn Kubernetes
To learn Kubernetes, the tutorials section of the official website is an excellent starting point. I followed it myself and later completed a couple of online training courses linked there.
Here are some notes I took during my learning journey.
Kubernetes: A Quick Overview for Developers
Kubernetes is an open-source container orchestrator originally developed by Google and now maintained by the Cloud Native Computing Foundation.
Core Components
Every Kubernetes infrastructure includes the following:
- Master Node: Coordinates all cluster activities, including scheduling, application maintenance, scaling, and updates.
- Worker Nodes: Execute applications and include:
- A Kubelet: An agent that communicates with the Kubernetes Master via the Kubernetes API. It manages pods and the containers running on the machine.
- A container runtime: Responsible for pulling container images, unpacking them, and running applications (e.g., Docker, rkt).
A production infrastructure requires at least three nodes.
To run Kubernetes locally, install Minikube, a lightweight Kubernetes implementation that creates a virtual machine on your local machine. Minikube deploys a simple cluster containing only one node.
Kubectl
Kubectl is Kubernetes’ CLI tool that uses the Kubernetes API to interact with the cluster. You can use it to manage local deployments via Minikube or remote deployments in the cloud. It is functionally similar to the docker command in Docker.
Deploying Applications
To deploy an application in Kubernetes, define a deployment configuration in a .yml (preferred) or .json file. The configuration tells Kubernetes how to create and manage instances of the application. The Kubernetes Deployment Controller (KDC) ensures instances remain up and running.
If a node fails, the KDC automatically starts the required containers on the remaining functional nodes (self-healing).
Pods and Services
-
Pods: The smallest deployable units in Kubernetes, representing a group of one or more containers with shared resources like volumes and networking.
- Pods share namespaces and have a single IP.
- Pods are private and isolated within the cluster but can communicate with other pods and services in the same cluster.
-
Services: Provide a stable network endpoint for pods, enabling traffic routing even as pods die and are replaced. Services are defined in
yamlorjsonfiles and use labels and selectors to route traffic to the correct pods.
Types of Services:
- ClusterIP (default): Accessible only within the cluster.
- NodePort: Exposes the service on each node’s IP at a specified port, making it accessible outside the cluster via
<NodeIP>:<NodePort>. - LoadBalancer: Integrates with cloud provider load balancers.
- ExternalName: Maps a service to an external DNS name using a
CNAMErecord (kube-dnsv1.7+ required).
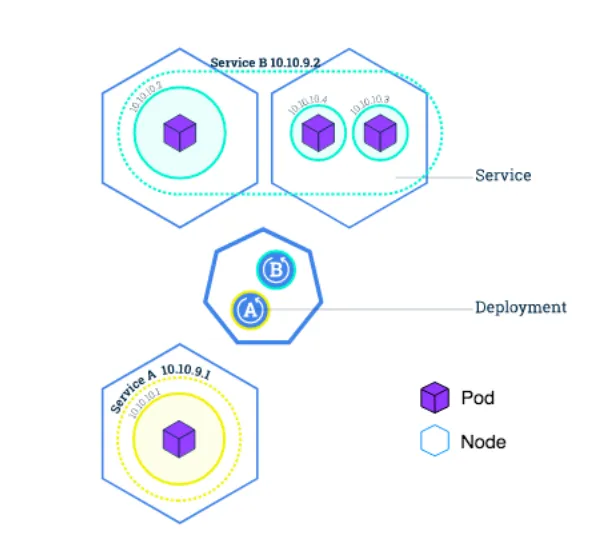
Diagram
Below is a representation of nodes, pods, services, and their relationships:
Kubectl quick reference
       # Note: each line is a specific example
# Don't copy paste this on the terminal!!

# Create a proxy that forwards communications into the cluster-wide
# private network.
kubectl proxy

# Save the current pod name in an environment variable
# and access it through the proxy
export POD_NAME=$(kubectl get pods -o go-template --template '{ {range .items} } { {.metadata.name} } { {"\n"} } { {end} }')

# Test the pod access via proxy
curl http://localhost:8001/api/v1/namespaces/default/pods/$POD_NAME/proxy/

# Minikube
minikube version
minikube start

# Deploy a dashboard
kubectl apply -f https://raw.githubusercontent.com/kubernetes/dashboard/master/src/deploy/recommended/kubernetes-dashboard.yaml
kubectl proxy
kubectl create serviceaccount cluster-admin-dashboard-sa
kubectl create clusterrolebinding cluster-admin-dashboard-sa \\n  --clusterrole=cluster-admin \\n  --serviceaccount=default:cluster-admin-dashboard-sa

# Get secret to connect to the dashboard
kubectl get secret | grep cluster-admin-dashboard-sa
kubectl describe secret cluster-admin-dashboard-sa-token-sblqz

# Run a new image / create a new deployment
kubectl run nginx --image=nginx:1.10.0 # deploy nginx
kubectl run kubernetes-bootcamp --image=gcr.io/google-samples/kubernetes-bootcamp:v1 --port=8080

# Apply whatever it is described in a file (deployment, service, secret...)
kubectl apply -f your-file.yml

# Delete
kubectl delete -f your-file.yml
kubectl delete service -l run=some-app # Remove services labeled with `run=some-app`

# Get information
kubectl version
kubectl cluster-info
kubectl get [all|nodes|pods|deployments|services|replicasets]
kubectl describe pods nginx-68c5b54745-hxn8r
kubectl logs nginx-68c5b54745-hxn8r -f

# Expose a deployment
kubectl expose deployments nginx --port 80 --type LoadBalancer

# Forward ports
kubectl port-forward nginx-68c5b54745-hxn8r 10080:80

# Label
kubectl label pod $POD_NAME app=v1 # Add the label `app=v1` to the pod `$POD_NAME`

# Scale
kubectl scale deployments/kubernetes-bootcamp --replicas=4

# Update/Rollback and undo
kubecel set image deployments/your-app=you/your-app:v2
kubectl rollout status deployments/your-app
kubectl rollout undo deployments/your-app

# Execute commands on a container in a pod
kubectl exec nginx-68c5b54745-hxn8r --stdin --tty /bin/sh